What Causes Welding Spatter and How Do You Reduce It?
Last Updated on

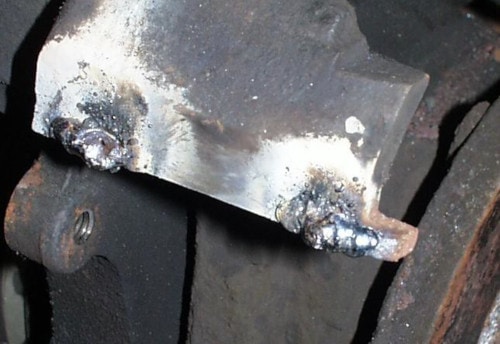
Have you ever laid your final bead on an immaculate project, only to find tiny metal balls melted all around your weld? How about spending a few minutes in a scorching shower of lava-like drops sizzling welts into your skin? Most of you will know what I’m talking about, but if you weld and are unfamiliar with this now, you will be faced with these all-too-familiar scenes soon.
What am I talking about? It’s called welding spatter, the term for blobs of molten metal that are spat from your weld over your job or body. The blobs are in a liquified form, and they stick themselves to almost everything they land on. If they fall on your project, they will leave a nasty mess to clean up. If they land on your overalls, they can burn through onto your skin, soldering a gruesome hole into you.
Spatter is a nightmare for many welders, and although you can’t avoid it completely, you can minimize it significantly. As you read about each cause, use the solutions provided to reduce its effect for a pain-free welding experience.
Weldable Metal & Welding Spatter
The quality of the material you weld significantly determines how much spatter is produced. This ranges from the composition of the metal to its coating, along with the cleanness of its surface.
Cause: Metal Composition
Some metals are not designed for welding. They have components added to them with different strength that doesn’t include weldability. Others are sold as weldable metals but are manufactured as inexpensively as possible, with cheap additives included in the core manufacturing mixture. If you are concerned about welding spatter, don’t use either type of metal. While inexpensive materials are appealing, the contaminants and non-weldable components they contain often cause excessive spatter when welded.
Solution
These materials are the wrong choices to weld with. Finding a new metal to use is the only way to minimize the spatter in this case. If these materials are all you have and you need to get the job done, follow the “other solutions” section to reduce the spatter’s effect upon your project.
Cause: Metal Coating
While the right type of material is critical to ensure minimal spatter, sometimes a project requires a specific coat to cover the metal before you weld it. This includes galvanized coatings, any metal plating like zinc (Electrogalve), chrome, paint, rubber, and anything else that covers the metal surface.
Basically, the purer the material being welded, the cleaner the weld will be, resulting in less spatter. Some coatings like pre-primed steel off the shelf have been designed without weld contaminants, meaning they will not add to spatter issues, but the majority will make your life difficult if left untouched.
Solution
Grind off the coat where you will weld. The layer will melt away when welded, but grinding it off before you weld will provide a pure surface to work with, producing much less spatter. Be sure to grind at least ¾ of an inch around where you’re welding. The intense heat will consume anything near it, producing excess spatter even if it’s not directly in the weld.
Cause: Dirty Metal
Just as components within the metal and coats covering the surface cause welding issues, dirt is a significant contributor to spatter. Whether it’s oil, grease, marker pen lines, or a bit of dust, it will not merge well with your weld, causing spatter issues.
Solution
Clean before you weld. Welding is a straightforward process that should produce minimal spatter if all the prep work is done first, and cleaning is a crucial aspect of this. It doesn’t take much. A quick wipe with a rag before you crank the heat will help ensure a smooth weld and keep spatter to a minimum.
Weldable Filler
Quality material creates quality welds, and quality welds have minimal spatter. If you purchase the right metal but not quality filler wire or rods, you’ll be back to square one with spatter issues.
Cause: Low-Grade Filler
You get what you pay for, and if you want to get rid of spatter, it pays to choose a quality filler metal. Regardless of the welding discipline, the consumable you use needs to have the right composition to produce clean welds. As with parent metals, it’s cheaper for companies to create filler products by adding components unrelated to welding. They still serve their purpose in being weldable and adding fill to your weld, but extra spatter is a typical result of the compromise.
Solution
Research the quality of the fillers you plan to use before you buy. Don’t just buy the lowest-priced to save money, or even the most expensive to get the best. Research the various types and be sure what you buy is a quality product, so it produces the least spatter.
Cause: Contaminated Filler
Welders leave their consumables around without covers. They get contaminated with oil, dirt, and dust, and can begin to rust from inactivity. Dirt and rust directly entering the weld will cause excess spatter.
Solution
Look after your consumables by keeping them covered when they aren’t being used. Stainless steel filler rods are not so critical because they won’t rust, but if they are kept out, make sure you wipe them before you weld. Steel dust, however, can cause stainless rods to rust and can contaminate welds. If you’re grinding steel, keep stainless rods away.
Even though most MIG welding spools are covered, the wire should always be in a bag when not used, unless it’s used frequently, or the spool cover is sealed. Moisture can build up on the coil when it’s left without a covering for too long, causing rust to form.
SMAW (arc or stick welding) rods are less critical, as the flux on the rod has a unique way of removing contaminants like air and other impurities from welds. Wet or oily rods, on the other hand, will produce much more spatter, so it still pays to keep these in a bag or container.
Welder Settings
If you buy some quality steel, with the top consumables for it, clean everything spotlessly and dive into a weld assuming all will be well, you still might get terrible spatter. As necessary as the quality of the materials you use is, if your welder settings are wrong, you will have the same problem.
MIG Settings
A common cause of MIG welding spatter is excessive speed or irregularity with your wire feed. Spatter occurs when the filler wire enters the weld pool. The solid wire melts at a rapid rate due to the extreme heat. As it melts, the filler wire turns into a liquid form, creating the pool. If the wire is hot enough before it hits the steel, it will melt into the puddle gently with very minimal spatter. When it’s too cold, the wire hits the pool before melting and splashes it, causing a pop and splutter with spatter flying out.
The welder settings need to be hot enough for the wire to melt before it hits the pool at a healthy pace. If it’s too hot, the wire will melt too far away from the pool, causing spatter from the vast space between the puddle and the liquifying metal traveling towards the pool. It can also create a sticky nozzle tip when the wire melts near it. Residue builds up, causing an inconsistent feed rate due to the wire sticking. This results in further spatter. Note that the heat of your weld is determined by increasing or decreasing the amperage and voltage of your welds.
SMAW Settings
The same principle applies to SMAW welding. Your heat needs to be right for the sized rods and metal thickness. If your welding is too cold, there won’t be a smooth consistency in your weld. It will pass between welding and sticking, causing excessive spatter, an ugly weld, and overall frustration in the process.
If your welding is too hot, you may create a consistent weld, but you must travel much faster to avoid burn through or creating an undercut. Excess speed increases the spray of spatter. Maintaining a consistent heat perfect for the plate thickness and rods will produce the cleanest weld.
Solution
To ensure that your welder is not contributing to spatter issues, practice on some clean scrap metal to adjust your MIG and SMAW welder settings until you refine them. It is helpful to know what the welder and consumables recommendation settings are for your project (found on the welder or consumable packet), but don’t rely on it if there is still spatter. With welding, the variables of reality mean your own trial and error is often the best option when things aren’t going right.
Welder’s Technique
When I began in the workshop, my boss set the welder up with the ideal settings for the job. I had thoroughly prepared all my pieces to weld and cleaned them immaculately. Yet, as I jumped in confidently with the project, the weld spat away at me, causing a mess all over the frame. I had everything right except knowing the right techniques to weld. The lesson I learned was not to forget the fundamental root of proper welding technique: you should prepare everything well, but learning the right methods is equally as crucial.
MIG Techniques
If you’re firing at the metal with a MIG torch at an angle of 20° or more, don’t expect it not to spray off with spatter. Getting your angle right not only changes the penetration and form of your weld, it’s also a crucial player in how much spatter you produce. Travel angle is useful, but the steeper the angle is past 15°, the more spatter you will have.
As mentioned, consistency in wire speed minimizes spatter. Likewise, consistency in travel speed, along with a steady hand, ensures a clean weld. The more consistent you can be with the technique your weld requires, the less spatter will occur. Find the right angle, speed, and line, then stick to it.
Make sure the technique you are using is correct for the type of weld and material. One example of this is pushing or pulling your weld pool. When your weld requires high and consistent heat input, pulling your weld along (traveling with your torch angled away from your traveling direction) is the way to go. If the weld requires more heat dispersion, rather than a localized heat input, pushing (angled toward the direction you’re moving) is the way to go. Using the wrong technique for the requirements of your weld will produce excess spatter.
- See also: What is MIG Welding Used For?
SMAW Techniques
Unlike MIG welding, there are fewer SMAW techniques that determine spatter results, but pulling, for example, creates more spatter than pushing. When you can push, then push, but remember, don’t just stick to one technique because it typically creates less spatter. The right method for the correct weld is also crucial with SMAW for less spatter.
Ensure your travel speed is correct, and travel fast enough for a clean weld, but remember that with more speed comes more spatter. Find the right welding rate and stick with it consistently to achieve the best results.
Welding Gas
Gas is another crucial element in spatter issues. The type of gas you use can have an immense effect on how clean your weld is, which will affect the amount of spatter you produce. There are various gases you can use to shield your MIG welding, but argon and Co2 are the most common and best to use.
Pure Co2
Pure Co2 is a less expensive gas to buy. It shields well and facilitates deep penetration, but it is known for producing much more spatter than argon.
Pure Argon
Pure argon is primarily used to MIG weld aluminum (an alloy with minimal spatter problems), and for TIG welding stainless steel. It does not produce quality MIG welds in steel and will have an effect similar to pure Co2 with bad spatter.
Argon and Co2 Mix
Various mixes are best for different kinds of MIG welding, including 95% argon, 5% Co2 to 80% argon, 20% Co2, with a few combinations in between. The thicker the steel is, the higher a percentage of Co2 should be used. If you choose the right mix for your thickness, this will achieve the smoothest weld with the least spatter.
Other Solutions
While following the above solutions to minimize spatter from your welding will have significant results, there will usually still be some spatter. Whatever the project is for, spatter looks ugly and needs to be removed.
Unlike aluminum, spatter from steel and stainless welding is a challenge to remove. These three final solutions will not stop spatter, but they will keep it from ruining your work or wasting your time.
Anti-spatter
This useful product is an oil-based spray you apply over your welding area. It’s made to be welded over without affecting your weld quality. It prevents the spatter from sticking to the metal, leaving mainly loose balls on your project. Most of them can either be brushed off or easily chipped away. It is a useful product you will appreciate, but it’s not perfect. Some spatter may still melt into your workpiece.
Welding Tape
This tape is not your ordinary plastic tape. It’s generally made from aluminum and is applied anywhere you want to keep spatter away from, but it cannot be used directly where you weld like anti-spatter spray. It’s an expensive option, but for critical parts of projects, like a machined surface or any part that can’t be damaged, this is your perfect option. It can be pricey depending on where you buy it, but it will keep all spatter from melting into the areas where you apply it.
You can use other tapes or material for a lower price. Keep in mind that most materials will melt, burn, or even catch fire from the scalding spatter. Aluminum tape, however, will not let spatter through.
- See also: What is Peening in Welding?
Spatter Chisel/Hammer
When you have applied every solution to produce the perfect weld, and there are still a few spots of spatter over your workpiece, a spatter chisel/hammer is the best solution. With a spring in the handle and a cold chisel head, a spatter hammer will easily chip away everything left on your job. It’s quick, easy, and leaves little evidence of the spatter’s presence.
Grinder
The welder’s best friend with a flapper wheel is another great last resort. It won’t chip off the residue like a spatter hammer will, but it will grind it away to a clean finish. If you must do some finishing grinds on the project, it can be quicker to forget the spatter hammer and give the affected surface a tickle while you’re already grinding other areas.

RELATED GUIDES: 5 Gift Ideas for Welders
Conclusion
With all of welding’s challenges, spatter proves to be one of the most aggravating. Apply all six sets of solutions to your next welding project, and you will be sure to experience a difference.
Leave your comments and any tips below. We would love to hear from you.
Header image credit: Airman Jenna K. Caldwell, McConnell Air Force Base